Showing posts with label diy. Show all posts

Saturday

Here Kitty Kitty a Teapot Cozy Craft

I found this old pattern and thought those of you who enjoy sewing would like to give it a try.
What You Need
               1/2 yard plain fabric
                1/2 yard lining fabric
                1/2 yard batting
                8 inch x 4 inch contrast (fabric for the ears)
                Embroidery floss (similar color to the ears  looks nice)
                Needle
                Pins
                Sewing machine
                Iron, ironing towel or clean cloth
               
Lets Make It!
The template for the tea cozy is below. You will need to scale it to the correct size for your teapot. My tea cozy measured 12” along the bottom to fit my four cup pot.

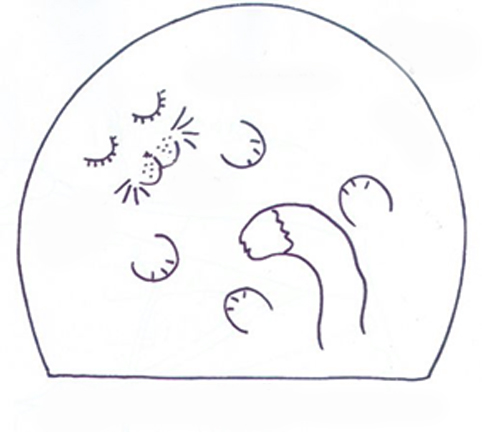
Cut two pieces of plain fabric, two pieces of lining fabric and two pieces of batting. Then cut two 4” x 4” squares in contrasting fabric for the cat’s ears.  

Using the template create the pattern onto one of your plain pieces of fabric. Stitch the features using back stitches, French knots and stem stitches. Take a moment to press the embroidered features with a towel and warm iron.

Then take one 4 inch 4 inch square of fabric and fold it in half diagonally right side out, then fold again so you have a triangle. Repeat with the other fabric square. Position your ears onto your embroidered fabric and then pin into place. The center points of the triangle should point inwards. Any raw stitches will not be noticeable after you stitch the pieces together.

Place your embroidered piece face-up, place the other plain fabric piece face-down on top of the embroidered piece and pin together. Machine stitch around the long curved edge and trims any excess fabric, particularly in the ear area, to avoid uneven bulking. Turn right-side out and set aside

Place batting on reverse side of lining fabric. Hold in place by basting a stitch along the edges ( or use temporary spray adhesive)Baste together each side with batting and lining in place. Stitch around the long curved edge leaving a 4” gap at the top to turn the cozy right side out. Trim away excess fabric/batting from the seam. Place the cozy interior inside the exterior, right sides together. Match side seams and pin the bottom edges together. Sew around the bottom edge. Turn the cozy right side out
( pull through the gap you left in the lining.)  Top stitch the opening in the lining closed, and then place the lining into the exterior, pushing into place. Top stitch around the bottom seam to tidy it up.
 Ta Daa you now have a cozy teapot.


```````````````````````````````````````````````````````````````````````````````````````````````````````````````````````````````````


You all know how much I enjoy blogging. Sharing with you all makes me smile. With so many wonderful bloggy friends,ideas and comments shared it  can make my heart sing.

Like you I'm hoping people will find my blog and in turn I'll discover new blogs too. I am always on the lookout for ways to get noticed. I tweet, not to be confused with toot. But I do that too, giggle (don't tell) and I facebook a little too. But, did you know that you can get your blog listed for free in the blog directory? The fine people of The Blog Guidebook have a section where you can list your blog! So buzz on over and add your blog to the list today!


P.S. please think of me when you're ready to redecorate your blog. Don't mind me "tooting" my own horn........Made It For You

Friday

Crafty Bottle Stoppers

The holidays are coming and many bottles will be opened. I thought this very simple craft would help to decorate your table or counter top. You could make a few to take as hostess gifts to your holiday parties too!


What You Need
Cork Stopper (available in various sizes at craft stores)
Your Choice of drawer pull ( screw should be attached)
Glue
Pencil

Let's Make Them! mark the center of the top of the cork with a pencil. Dab a little glue onto the bottom of the screw, and twist it into the cork at the mark. Depending on the pull type, you will either leave enough exposed screw to pass through the pull or thread the screw through the pull first.
Taa Daa! How simple and clever is this!
p.s. thyme and rosemary olive oil ( in photo) make great gifts.

If you make these I would love to see your photos!

Make A Lovely Table Runner For Your Summer Table


Make this unique table runner it is a great way to accent your summer table.


What You Need

1 yard each of 3 colors of Linen Fabric

½ inch wide single fold bias tape

Thread

Use the leaf template located at my website; cut 27 leaves (to make an 86 inch runner( add or subtract leaves to fit your table) from some your choice of fabric, (linen is best). Use a 1/2-inch-wide strip of bias tape to create a border along one side of each leaf, from tip to tip. There is no need to finish the tape's ends. Bind the opposite side of each leaf with a separate length of bias tape, covering raw edges at the  tips with an overlap finish. Arrange leaves in desired pattern; pin, and hand-stitch together.


Wallpaper Scraps


 I found some wonderful ways to use wallpaper scraps.I came across these creative and easy ideas for using leftover wallpaper.


Mount wallpaper remnants (especially antique or hand-painted ones) on fiberboard frames and then hang on the wall. A unique piece of art!

Cover the surface of a coffee table or small tabletop and then coat with polyurethane (or have a piece of glass cut to fit on top.)

Transform open shelving by adhereing to the inside of the shelves, so much nicer than just plain paint.

Cut flowers, birds, and shapes from  decorative wallpaper and paste them onto a wall. I think this is a great idea for a teens or child’s room.

Decorate the front of a chest of drawers by simply unscrewing the knobs, then lightly sand the surface. Cut strips to size―slightly smaller than the drawer front to create a framed effect, or large enough to completely cover the space―and adhere. Replace knobs. So easy!

Have fun, I'd love to know if you try any of these ideas.

Saturday

Button, Button, Who Has The Button

You know that little jar you have filled with odd buttons, well here’s a way to use them. It only takes a few stray buttons and some embroidery floss to make these cute napkins.
What You Need
Buttons, embroidery floss, thread (in the color of the fruit you want to create)
Standard sewing needle
Embroidery needle
Fabric napkins
Embroidery hoop (optional)
Fabric pen

Lets Make Them! Lay out your design on the napkin, arranging the buttons in place (mark with a disappearing-ink fabric pen if necessary), then sew on the first button, using matching thread. (For easier stitching, you may want to use an embroidery hoop.) Sew on the remaining buttons. Using the disappearing-ink fabric pen, lightly mark out the leaf or stem of the fruit or vegetable. Stitch along the pen marks, using embroidery floss and a classic chain stitch or a stem stitch. To make a stem stitch (which works well for stems), working from left to right, make standard, slightly slanted stitches along the line, keeping the thread below the needle. For leaves, use a satin stitch, making straight (not slanted) stitches, each touching the next, across the width of the leaf. That’s it! Ta Daa