Showing posts with label decorating. Show all posts

Friday

Kitchen Change Up Part One

Every once in a while I like to change things up around the house. My husband ( Sparky) doesn't understand it, but that's okay. giggle. As long as I stay out of his garage, he is loved and fed, he doesn't care how I decorate. LOL.

Right now I'm focusing on the kitchen. We've had a rust and gold color scheme and a Tuscan kind of feel throughout for quite some time now.  I am leaning towards antique whites and light greens with this change up.
When I'm out and about at the shops I often find things on sale that I like. I just tuck them away until the mood strikes me to make some changes.

 I decided to blog about the change up at the last minute, fun right? I always enjoy reading the blog posts and seeing the photos when you decorate. Let me apologize up front for neglecting to straighten the mat in the before shot. Planning would have prevented that.

I'm breaking the posts up into parts. It seems so much more dramatic and "taa daa" worthy that way.

I started with the top of the fridge. An often unnoticed area.

Before: warm rich colors

After: light with a spring time touch.
Little changes can make a big difference.

Did you notice the chopsticks in the planter pots? I reuse everything! The wood rabbit on the right side was carved by Sparky's Grandfather. He made it many years ago as a gift for his Grandmother. She bequeathed it to Sparky when she passed away. I love it! So that's part one, little mini taa daa!


Monday

Let's Play With Our Food

The holidays are the perfect time to play with your food. I hope you'll enjoy this delicious macaroon recipe, and these food craft ideas. They should all help to make the season bright and add some wonderful memories too. Enjoy!


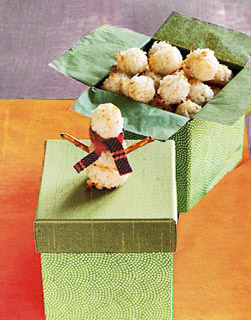
Macaroon Snowmen
What You Need
2 large egg whites
1/4 cup sugar
2 tsp vanilla extract
1/8 tsp salt
3-1/2 cups sweetened flaked coconut
3/4 cup macadamia nuts ( finely ground)
16 (5-inch) wooden skewers
16 mini gift boxes ( available in  the bakery dept)
Cookie sheets
Parchment paper
Cooling racks
Electric mixer
Pretzel sticks
Ribbon or fabric scraps

Before You Start : Preheat oven to 350 ˚Line 3 large cookie sheets with parchment paper.
Let’s make it! Beat egg whites in a large bowl on high speed until foamy, about 1 minute. Add sugar, extract, and salt, beating to stiff peaks, about 5 minutes. Gently fold in 2 cups coconut, then the nuts, until just combined. Roll with damp hands into 32 balls (3/4 inch in diameter) for bottom and middle of snowmen, and 16 balls (1/2 inch in diameter) for the heads. Roll balls in remaining 1-1/2 cups coconut, coating well. Carefully transfer to cookie sheets, placing 1 inch apart. Bake macaroons in upper and lower thirds of oven, switching positions halfway through, until bottoms are pale golden ( about 12 to 15 minutes) Transfer macaroons from cookie sheets to racks and cool completely.
To assemble snowmen: Push 1 skewer into the center of each box and carefully thread 2 of the larger macaroons through the skewer to sit on the box; top with a smaller macaroon for the head. Add pretzels, ribbon,fabric, etc for embellishments if desired. Fill the box with cookies. Makes 16 snowmen.


Gum Drop Trees

What you need
Styrofoam cones
Plastic wrap
Gum drops
Tooth picks
Lets Make them
Wrap the Styrofoam cones with plastic wrap. Insert tooth picks into the gum drops, poke the toothpick covered gum drops into the plastic wrapped trees. Be creative, use different colors add frosting for ribbon. It's edible fun.


Edible Snowman ( post from 2009) Click Here


Friday

Wallpaper Scraps


 I found some wonderful ways to use wallpaper scraps.I came across these creative and easy ideas for using leftover wallpaper.


Mount wallpaper remnants (especially antique or hand-painted ones) on fiberboard frames and then hang on the wall. A unique piece of art!

Cover the surface of a coffee table or small tabletop and then coat with polyurethane (or have a piece of glass cut to fit on top.)

Transform open shelving by adhereing to the inside of the shelves, so much nicer than just plain paint.

Cut flowers, birds, and shapes from  decorative wallpaper and paste them onto a wall. I think this is a great idea for a teens or child’s room.

Decorate the front of a chest of drawers by simply unscrewing the knobs, then lightly sand the surface. Cut strips to size―slightly smaller than the drawer front to create a framed effect, or large enough to completely cover the space―and adhere. Replace knobs. So easy!

Have fun, I'd love to know if you try any of these ideas.

Thursday

Toile


On a trip to a local discount store a few months ago I purchased a few yards of beautiful toile fabric (cream background and black print). Toile is short for Toile du Juoy (French for cloth)it has a repeated one-color pastoral scene usually printed in navy, red or black and is traditionally on fabric with a white or cream background. It was originally mass produced in Jouy-en-Josas France in 1760.


I wrapped this beautiful fabric in tissue and stashed it away knowing I would find a use for it one day. I recently decided to recycle some old wooden chairs for use in our guestroom. I used the lovely toile fabric to recover the seats of the chairs and I’m pleased to say they turned out well and I even have enough fabric left over to make a nice accent pillow.


Now I’m having trouble deciding what color daybed cover I should make/buy. To compliment the toile covered chairs. I usually don’t have much trouble deciding how to decorate. But, this fabric with its distinctive pattern has me at a disadvantage. I feel confident that I should choose a solid color daybed cover, but I’m undecided with regards to the color. If you have any suggestions for a complimenting color for my daybed cover I’d love to hear from you.


I encourage you to recycle when you can and re-purpose whenever possible.
Your friend, Katherine (a.k.a. Katie)


Copyright © Bobskatie Enterprises-Go Ask Katie blog/ Katie’s corner-all rights reserved